Showing posts with label 3D. Show all posts

Thursday, August 16, 2012

WOC New Product Blog Hop

Hi Friends~  Today the Wild Orchid Crafts DT is having a super fun hop!  We are introducing some fabulous NEW PEARL PRODUCTS that WOC now carries!
For my project I have made a cute wall hanging with a cutie pie Tear Bear that I have made.  Wood plaque has been coated with Luminarte Pink Azelea Silks!  Love the way this product coats wood!!!
Little Miss Tear Bear's eyes and nose got a coat of Diamond Glaze and a WOC Small Metallic Silver Bow gives her a cute hair tie.  Mini WOC flower arrangements consists of a 15mm Rose, 5mm Rosebud, Gypsophila, and a NEW Flat Back Scalloped Pearl.  Isn't that pearl awesome?!
Sentiment was computer generated and accented with two NEW heart pearls.  Second WOC flower arrangements consists of two 30mm Wild Roses, 15mm Roses, heart pin, and NEW Flat Back Scalloped Pearls.

Now make sure you head to all of the WOC DT Blog today and leave a message at each blog so you have your chance of winning one of the hidden gift certificate to Wild Orchid Crafts Store!!!


Kim <---you are here!

Then head to the Wild Orchid Crafts Store 
to you get your very own NEW PEARL PRODUCTS now!!!


♥ Thanks for stopping by! ♥
Photobucket
Pin It

Sunday, May 6, 2012

Pinterest Project #1

Happy Sunday...I hope you all are having a fabulous weekend!  Today I have a different type of project that I am so excited to share with you all!!!

How many of you are addicted to Pinterest?  My sister and I are very addicted and LOVE Pinterest....we have MANY projects in the waiting to complete and every day the list keeps getting longer and longer of things we want to make!

Yesterday we competed our very first Pinterest project!  In April my sister had the opportunity to head over seas and visit Germany, Italy and France.  Her boyfriend is in the U.S. Army and is stationed in Germany at the moment.  On her trip she took some AMAZING photos and found a project on Pinterest to take your photos and adhere them to canvas to hang on the wall as a collage.  She went and bought the canvases in three different sizes and then picked out which photos she wanted to blow up to those sizes.  I had some black metallic acrylic paint so she painted the edges of each canvas; and yesterday we used spray adhesive to attach the photos.
Here is the finished collage!  What do you think?  Of course these aren't on the wall yet; as my sister's boyfriend is coming back to the states in August so she will be moving, but we wanted to get the canvases complete now since she had the photos  :)  Aren't her photos gorgeous?   I can't wait to see this on the wall of her new home!!!
And one side view so that you can see the beautiful canvas edges!  We absolutely LOVE how this turned out!  Now we can say we actually completed a Pinterest Project! :)  I can't wait until my house is build so that I can make a photo collage with some photos of mine!  I hope we have inspired you to make a project that you have found on Pinterest! :)

♥ Thanks for stopping by! ♥
Photobucket
Pin It

Saturday, August 6, 2011

Peeking In to Say HI!

Hi Everyone~


I hope you are enjoying your week....good news it's the weekend!! YAY!!  I hope you all are controlling your PEEKER FEVER by purchasing your very own The Peeker #2 Collection by Elisabeth Bell for SCACD?!?!  I can tell you that I totally am controlling my fever by creating with this cuties!  Today I am sharing my creation using Secret Garden Peeker!  Make sure you grab a cup of coffee, tea, or hot cocoa, as this post is a bit lengthy....hee hee
Seriously I am soooo in love with all of these adorable Peekers!!!  Miss. 
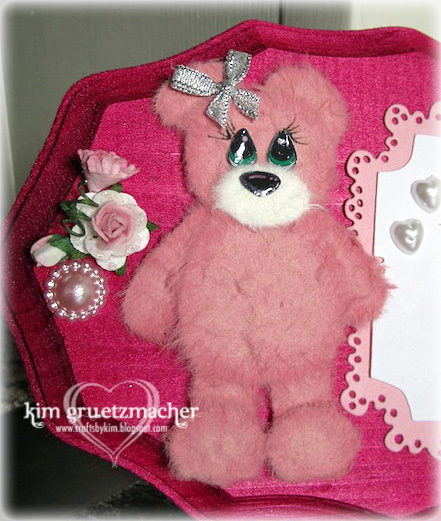
Secret Garden Peeker is so cute, I love how she is so shy, but yet wants to hop on over the fence to go and play with her friends!  The papers I have used on this cutie are the gorgeous and oh-so-stunning Kaisercraft Blae & Ivy!  OMG if you haven't ordered yours yet you sooooo need to get this pad...I love the elegance and beauty in each and every sheet in this pad!  And it has to be good if I love it and there is NO pink in it! LOL!  Susana has some AMAZING new 6x6 paper pads in too....you best go and order your favorites now before they are sold out!  Click -->here<-- to go and see what I'm talking about! :)
Sweet Garden Peeker was colored with Copics and accented with my pastel pencil.  I airbrushed the sky around her.    
The moment I saw this adorable Peeker I knew that I wanted to make a shaker card with her (Kylie has an amazing tutorial that I followed)!  The scene of this stamp is perfect to add some Green German Glass Glitter (80 Grit) mixed with some Kelly Green German Glass Glitter (100 Grit) ...have you seen the German Glass Glitter that Wild Orchid Crafts carries...oh my word....this stuff take glitter to a WHOLE new level!  The sparkle this glass glitter gives is totally out of this world....so much more sparkly that regular glitter!!!  I'm totally in love!!! WOC carries this is many colors and in medium and fine grit levels...which also mix very well together!t 

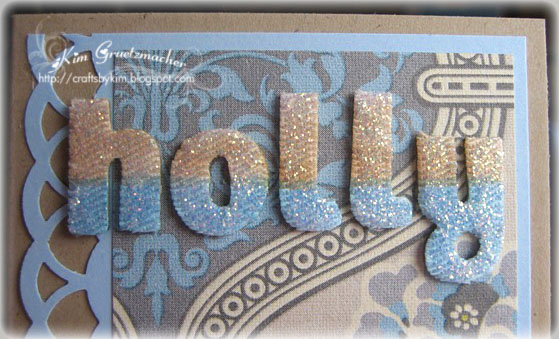
To make the shaker part of my card:  
1.  I cut my colored image out with my Labels 1 Spellbinder Die.
2.  I also cut out a piece of acetate using the same die that I used in step 1.
3.  I took my designer piece of paper and my Square Spellbinder Die and cut out a square. *Make sure that you leave enough edge around the square because you will also be cutting out the Label 1 again over top of the square.*  
4.  Now with the same piece of paper that you have from Step 3 with the missing square in the middle, take that Labels 1 die again from step 1 and place the die over the square opening (see I told you that you would be using this piece of paper again :)  When you cut this out it will give you the deisgner paper  frame.  
5.  Now Glue/tape (I used scor tape because it holds the best, in my opinion) your acetate piece to the back side of the frame that you just made in step 4.
6.  Now you will place foam tape all the way around the back side edges of the frame, do not leave any gaps. (If you leave gaps then you will have glitter all over when you shake your card.)
7.  Pour your glitter into the middle of your frame on the acetate.
8.  Attach your colored image to the foam tape.
9.  Finally, shake and look at the beauty you just created!

Now back to the contents of the card:
 The lace is also from WOC!  This is actually two types of the lace at the store.  The top layer with the blue edging is White Kniting Lace with Baby Blue Edging which is layered on top of some Wide White Guipure Lace.  The bow is created with some gorgeous silk ribbon and my Bow Easy...Gotta love being able to get the perfect bow every time!  The corner was accented using a decorative metal corner...I so love the elegance that these add!
 My flower arrangement was made using Wild Orchid flowers that consists of:  25mm Rose, Cherry Blossoms, 15mm Roses, the green 15mm roses are the moss green roses from the classic colour collection (love the beautiful deep color of these!), 5mm closed rosebuds, and Gypsophilas.  The beautiful crochet butterfly is NEW Venise Lace at Wild Orchid...these appliques are stunning!!!  I then added some gorgeous self adhesive pearls to accent this beauty as well as the sentiment on the card (sentiment is from Kraftin Kimmie)!  Foam tape was used to pop up the wings to appear that the butterfly has just landed on the card.
From here you can see all the dimension of the card! :)  I hope you have enjoyed this cutie!  I can't wait to see the beautiful shaker cards you all make now!!!  Please drop by and leave me a link to your shaker card...I'd LOVE to see what you create!


Copic Colors Used: Hair: E11, E15, E25, E29, Skin: E000, E00, E11, E21, Dress: B000, B24, B32, RV09, RV19, Fence: E25, E30, E31, E33, E50, E59, E99, Grass: YG00, YG03, YG67, G14, G21, G99, C6, Flowers: V05
♥ Thanks for stopping by! ♥
Photobucket

Tuesday, July 26, 2011

My Purse...

I'm hoping that you are all loving the Peeker Sneak Peeks! Don't forget to check the SCACD Blog daily to find out who is showing the next Peeker and for your chance to win some stamps!  Today, as promised, I am happy to share with you the gift that I made with yesterday's card.
When I saw Mama's Purse Peeker I just knew that I had to make a purse to go along with this cutie pie!  I used some more of my  Kaisercraft Chapter One Collection papers.  Added some rhinestone swirls, ribbon, and a beautiful button to finish.
I found the template for my purse, here.  Surprisingly this was very easy to put together too!
The purse is held shut with a magnet and is perfect to house a gift card to give to someone special!  I hope that you have enjoyed my gift set!  Thanks again to everyone who left me comments yesterday, all of your kind words truly make my day!

If you are interested in purchasing this gift set it is for sale on my Shophandmade Store, click -->HERE<-- to go shop! :)

**Don't forget to comment on the below post for your chance to win this cutie pie stamp!!**

♥ Thanks for stopping by! ♥
Photobucket

Monday, March 14, 2011

MAMM - Clearsnap Design Adhesive

Welcome Back!  Today's a Double Post Day...so please scroll down to see my Wild Orchid Challenge Post!!

It's the FIRST MONDAY of the month....which means it's Make A Mess Monday over at SCACD!  Today Marti and I are showcasing the fabulous Clearsnap Double Side Adhesive Design Stickers!  This product is absolutely fabulous and EASY to work with!
 I've decided to alter a little notebook using the NEW Call Me stamp by Victoria Case for SCACD.  This beauty is part of The Retro Crew Collection....oh my goodness is this set so adorable and really takes me back into my younger years.  Call Me totally reminds me of myself when I was a teen!  I swear I sretched our rotary phone cord out so far that you could walk around the house with it!  LOL!  Everytime my friends came over they laughed at our phone!  I've taken a piece of cardstock, and used the Pretty Petals Clearsnap Adhesive, then took my TonerTex Foil and got this beautiful and customized designer paper.
Call Me cutie has been colored with Copics and accented with a white gel pen. She's been cut out using the mega oval, then I took my TonerTex Pen and went around the edge of the oval...after the adhesive turned from blue to white I then took my green foil and accented the edge of the oval.  I love how easy this is to use and gives such a dramatic look....and it also matches my Clearnsnap Design too!
Doohicky Flower die and rose have been accented with Star Dust Stickles for extra glitter!  Here's another view so you can see the beautiful design that you get using the Clearsnap Designs!  I have another project that I am working on using the Clearsnap....I'll have it posted later this week for you!

**SCACD NEWS**  We are starting a Challenge Blog....SCACD Friends with Heart Challenge Blog debuts on April 5th....hurry over to the challenge blog to get our blinkie and sign up to be a follower!!  One lucky follower will be in for a HUGE SURPRISE on Grand Opening Day!  You don't want to miss the fun!!!

Recipe:
Stamps: Call Me stamp by Victoria Case for SCACD
Inks:Memento Tuxedo Black, Copics, White Gel Pen, Copic Spicas,
Copic Colors Used: Hair: E25, E31, E34, E50, Skin: E000, E00, E11, E21, R11. R02, Makeup: R81, R83, Shirt/Shoes/Earring/Bow: RV23, RV25, RV29, Jeans: B91, B93, B95, B97, Belt: Gold Spica, Silver Spica, Phone: YG21, YG23, YG25
Papers: scraps,
Tools: Magnolia Doohicky Dies,
Embellishments: Pretty Petals Clearsnap Adhesive, then took my TonerTex Pen & Foil, 15mm Rose, Star Dust Stickles.


♥ Thanks for stopping by! ♥
Photobucket

Saturday, February 26, 2011

First Signs of Spring

Happy Saturday to you all!  I hope you are having a fantastic weekend!  Mine is bound to get A LOT better today....even with the mounds of homework that I have to do...hee hee!  My path to becoming a CPA is closely becoming a reality and I love it!  Today I have a fun and easy project to share with you!  This is a pocket calendar that I picked up and altered! 
Don't you just love this cutie from the Reflections #2 Set by Carmen Medlin for SCACD?  I absolutely LOVE this beauty...her name is 1st Signs of Spring!  She was the PERFECT image for altering my pocket calendar....add a few nesties, a dolie and some bling and there you have it....a customized one of a kind beautiful pocket calendar!  This was part of the birthday present I gave to my friend.  She absolutely LOVES pink (just like me) and she loves zebra print.....and my favorite part was that she absolutely loved her gift! :)
1st Signs of Spring was colored with Copics!  
Flower was made with my Magnolia Doo-hickey die and then a Prima bling was added to the center.  Check out all of the amazing Prima Blings that Susana has in the SCACD store -->here<--!  Her selection is wonderful!

I hope you liked my fun project for today!  Make sure you stop back on Monday to see my latest project using one of the NEW EXCLUSIVE SCACD stamps!

♥ Thanks for stopping by! ♥
Photobucket

Monday, December 13, 2010

MAMM #6 - A Girl's Best Friend

**It's a 2 post day....If you are looking for my WOC challenge post, please scroll down.**

Welcome to SCACD Make A Mess Monday....the messy team has decided to bring you our fun on the 2nd Monday of the Month instead of the first!!!  Today we have some FUN FUN FUN for you!  Today we are showcasing JEWELRYJewelry is every girl's best friend....isn't it?!  Well it is mine and I had a BLAST making these necklace pendants!  Susana carries ALL of the products to make these in her store...so if you get your order in quick you just might be able to make some jewelry to give as Christmas Gifts!
 My first pendant is made using the silver rectangle finding that you can find -->here<--!  I then took some Blue Flash particles and sprinkled them in the finding.  After that I took my Viva Decor Glitter Liner in Hologram and filled in the pendant....look at all the sparkle that the Viva pen gives once it is dry...and mixed with the Blue Flash it's stunning!
These next pendants were made using the round pendants that you can find -->here<--!  These were actually designed using Viva Decor Pearl Pens.  The one on the left is made using Black and Light Blue.  The one in the middle is made using Ice White and Violet, and the one on the right is made using Black and Ice White.  To make them I:
1.  First took my background color....in most cases the black and filled in the pendant so it was almost level
2.  Then I took my next color and put a drop onto the end of a tooth pick
3.  I placed the toothpick into the black that was already in the pendant finding and swirled the two colors together (but not too much or the two colors would totally mix and wouldn't show the swirls). 
4.  Then I repeated steps 2 and 3 until I liked the finish effect.
Then you have to let the Viva dry/cure, I let mine sit for a few days.  Make sure to have them lay flat to dry.
Then take a paint brush and lightly coat on a layer of diamond glaze to seal your pendant.  Again let the diamond glaze totally dry before placing the pendant onto a necklace.  
Here is another batch of the Viva Swirl Pendants!  These are made with the black pendant findings that you can find -->here<--.  I personally love these black findings the best, especially if you are using black as your background color.   These were made using the same technique above and colors are from left to right: Black and Cream; Black and Magenta; Black and Kiwi; and Black and Ice White.

Susana carries MANY DIFFERENT SIZE Pendants over at SCACD, click -->HERE<-- to go and see her amazing selection!  Don't be afraid to experiment because you never know what you can put together.  These were all made by experimenting and I have to tell you I absolutely LOVE them!!!  I will have some going up for sale in my store soon!!!

Now make sure you head over to the SCACD Blog to see what kind of jewelry Marti has created!!!

♥ Thanks for stopping by! ♥
Photobucket

Friday, December 10, 2010

I Heart Ya Notepad Holder

Happy Friday!!!  I hope you all have some fun planned for this weekend!  I will be working on my advertising project for a presentation next week, and of course studying for my finals which also are next week....but after next week I only have ONE MORE SEMESTER left of school!  It is so exciting to know that graduation is getting closer....I never thought this time would come!! I'm looking forward to starting my internship as well!

Today I have a fun SCACD project to share with you!  At my last craft show I had a customer order a reuseable notepad holder for her 19 year old daughter for Christmas!  And this is what I came up with:
I thought it turned out absolutely beautiful....I so love when things turn out better then planned!  I hope my customer likes it as much as I do! :) I've used the cutie pie I Heart Ya by Elisabeth Bell for SCACD from the Sampler Edition #3.  Isn't she so sweet....perfect for any occasion....birthday, sympathy, thinking of you, or any holiday!  Papers are from K&Company Amy Butler Lotus collection!
This little darling was colored with Copics and accented with a white gel pen.  I've popped her up onto a SB Labels 14 which was matted with a nellie snellen die which was accented with 3mm pearls from Wild Orchid Crafts...they have a huge selection of colors available in the self adhesive pearls!!! 
Flowers are also from Wild Orchid Crafts and consist of one of the NEW SMALLER Flat Gardenias!  I've also used 20mm roses, and 8mm semi-open roses (which have been airbrushed to match the color theme of the notepad holder), and clear crystal stems.  The bottom edge of the notepad holder has been accented with 5mm pearls.
Finally I took some white fabric Thickers and airbrushed  them to match my color theme and then added lots of Diamond Stickles to add some sparkle to the project.

I hope you have enjoyed the project!  I forgot to take a picture of the inside before I packaged it up for shipping!  I am going to be making some more of these so I will make sure to remember to take a picture of the inside for you then! :)

***Don't forget to check out the AMAZING NEW PRODUCTS in over at the SCACD store!!!***  You can find New Flower Soft colors, New Dreamweaver Stencils, and New Inkadinkado Stamps!  Click -->HERE<-- to see them!!!  Happy Shopping!!!

Recipe:
Stamps: I Heart Ya by Elisabeth Bell for SCACD from the Sampler Edition #3 
Inks: Memento Tuxedo Black, Copics, White Gel Pen,
Copic Colors Used: Hair: YR24, Y18, Y32, E99, Shirt, Headband, & Socks: B0000, B000, B00, B52, Skirt, Shoes & Headband: E0000, E41, E42, Skin: E000, E00, E11, R02, Shading: W3, Heart: E25, E53, E57, B00, B52.
Papers: K&Company Amy Butler Lotus collection
Tools: SB Labels 14, Nellie Snellen die, MS border punch,
Embellishments: 3mm pearls, Small Flat Gardenias, 20mm roses, 8mm semi-open roses, clear crystal stems, 5mm pearls, Diamond Stickles

♥ Thanks for stopping by! ♥
Photobucket

Monday, November 8, 2010

MAMM #5 - Ornaments

Happy Monday to you all!  Wow what a weekend I had.  On Saturday and Sunday my mom and I were are craft shows.  We had a booth and were selling our crafts...this year we had an amazing display board for all of our cards that my amazing hubby made for us!  I took pictures, and will share them with you this week! :) We had a successful weekend and are looking very forward to the De Pere High School craft fair the end of this month!

Today is Make a Mess Monday (MAMM) over at SCACD!  Oh how I LOVE  making my messes!  Our challenge this month was to Decorate Ornaments using my ultimate FAVORITE product Viva Decor Precious Metals!  Seriously if you haven't ordered any Precious Metals from Susana you REALLY REALLY REALLY NEED to get some!  These are the most amazing metallic paints that I have ever worked with!  I still am amazed every time that I use them that they only take ONE COAT to cover your surface!  My hubby was even surprised at how awesome they are!

 Here I took a wooden snowflake ornament and covered it with Viva Decor Blue Azure Precious Metals paint.  This is my ultimate favorite color, as the blue is so beautiful but it also have a gorgeous silver tint to it.  When you paint with this color on wood the silver in the color defines the wood grains.  I absolutely love this one!

Then to accent the snowflake's edges I took my Viva Decor Glitter Liner in Hologram and outlined the whole snowflake...love the extra glitter and sparkles!  What I really love about the Viva Glitter Liners is that they hold their shape when you use them....meaning that when I made the edging around the snowflake it creates a "ridge" adding dimension.  Love it!  Then I took my Viva Decor Light Blue Pearl Pen and added some custom sized pearls that were a perfect fit for my snowflake!

 My second ornament today is again taking a wooden ornament and this time painting it with Viva Decor Blackberry Precious Metals.  Like the Blue Azur the Blackberry also has that gorgeous tint of silver in it!  This is another of my favorite colors from these paints! 

 How about these flowers?  These are the NEW Petaloo Velvet Hydrangeas!  Oh my word are they absolutely gorgeous and add the perfect amount of elegance to this ornament.  The flower arrangement is then finished using some Wild Orchid Crafts flowers consisting of 4mm closed rosebuds, mulberry GypsophilaRose leaves, and pearl sprays.  To accent the ornament my Viva Decor Rose Paper Pen was used to again add some custom sized pearls.


I hope you have enjoyed.  Make sure you head over to the SCACD Blog to check out what the other Messy Girls have made! :)


**SHOPPING NEWS**Susana has some fabulous new goodies in at SCACD! Have you seen the new Basic Grey Curio and Marjolaine Collections?!  Oh my goodness I love them both!  Then you have to check out the My Mind's Eye Fine and Dandy collections, Tickled Pink and True Blue, both are so adorable!  The Petaloo Red Velvet Pointsettia Flowers are back in stock along with some super cute Gingerbread People and beautiful assortment of leaves!  Looking for a unique Christmas card grab some Dreamweaver Embossing Paste and this NEW Dreamweaver Ornament Stencil to create some breath taking cards!  Finally make sure to check out the NEW fun colors of Sparkly Fluff...gotta love sparkles!  Happy Shopping!

♥ Thanks for stopping by! ♥
Photobucket

Wednesday, November 3, 2010

WOJ #91 - Christmas Card

Good Morning~ Sorry my post is going up a little late!  I had a terrible migraine yesterday.  Today is Whiff of Joy Challenge day and our challenge for you is to make a Christmas card.  I decided to make a Christmas notepad holder.
I've used Wee and Christmas Tree.  Papers are from K&Company.
Wee has been colored colored with Copics and accented with a white gel pen.  Gemstones were added to the Christmas tree to represent the ornaments and Lemon Spica was used on the star for the glittery effect.
Here is the inside of the notepad holder that has been decorated as well.  Sorry this is so short...I'm on my way out the door for school! Only one more day of classes this week....but then I have to get ready for two craft shows that I have a booth in on this Saturday and Sunday!

Make sure you head over to the Whiff of Joy Challenge to check out the amazing samples by the other girls!

♥ Thanks for stopping by! ♥
Photobucket

Monday, October 25, 2010

Rose Petal Love

Hi Friends~ Today I have a fun project to share with you!  When I first saw the Rose Petal stamp in the New Mini Sampler Edition #1 by Elisabeth Bell for SCACD I immediately thought of Anne Geddes!  I have admired Anne's photography forever.  If you are unaware of Anne Geddes she takes fabulous childrens photographs!  Some day when I have children I am hoping to have some fun baby pictures influenced by Miss. Geddes and now by Elisabeth Bell with her brilliant beauty! 
I found this gorgeous shadow box/photo frame on one of my shopping excursions.  It actually was a compose your own monogram frame...however, when I saw it I knew I could add some beautiful flowers, and a gorgeous image to make this a beautiful wall hanging.
Rose Petal was colored with CopicsStar Dust stickles was used to accent the rose on top of her head.  I wanted to use my Champagne Pink Wild Orchid Roses, so that is what inspired me to color the roses on my image the pink and yellow that they are.  The background that Rose Petal was popped up on has been created with Viva Decor Pearl Champagne Modeling Cream and my Dreamweaver Flower Lace Stencil.  I love how using the Modeling cream and stencil adds such an elegant look to this amazing image!
Flowers of course are from the fabulous Wild Orchid Crafts and the arrangements consist of 25mm Wild Roses, Cherry Blossoms, 6mm closed rosebuds, and 15mm Roses.  Again all flowers came in the Champagne Pink color (one of my ultimate favorite colors from WOC!)
For this angle I am hoping you can see all of the sparkle as well as the beauty from the Viva Modeling Cream!  Thanks for stopping in to see my creation! 

This wall hanging will be for sale in my Shophandmade Store shortly, if you are interested in purchasing it.  For those of you unfamiliar with Shophandmade....It is VERY similar to ETSY except it has LOWER selling costs associated with listing your items for sale! 

BLOG CANDY REMINDER:  Don't forget there is a lot of excitement going on over at the SCACD Blog this week!  We are so excited to release the very first stamp set from our NEW ARTIST!!!!  You really don't want to miss this event!  If you haven't signed up for Susana's blog candy....what are you waiting for?!  She is giving away many of the new sets as well as some amazing shopping coupons!  ALSO...Elaine from Quixotic Paperie is also giving away a set of the NEW ARTIST Release!  Make sure you head over to her blog and sign up for your chance to win as well!  FINALLY, if you HAVE ALREADY signed up for the blog candy...make sure you keep checking out the SCACD Blog this week as Susana is offering sneak peeks of the NEW ARTIST!!! :)

Recipe:
StampsRose Petal from the New Mini Sampler Edition #1 by Elisabeth Bell for SCACD
Inks: Memento Tuxedo Black, Copics,
Copic Colors Used: Skin: E000, E00, E11, Shading: W3, Hair: E25, E53, E57, E59, Flowers: Y0000, Y32, RV00, RV21, Leaves: YG13, YG95, YG99, Flower Pot: E13, E17, E18
Papers: Textured Cardstock from my stash

Embellishments: 25mm Wild Roses, Cherry Blossoms, 6mm closed rosebuds, and 15mm Roses. Star Dust sticklesViva Decor Pearl Champagne Modeling Cream and Dreamweaver Flower Lace Stencil

♥ Thanks for stopping by! ♥
Photobucket

LinkWithin

Related Posts Plugin for WordPress, Blogger...