Showing posts with label Cuttlebug. Show all posts

Sunday, May 23, 2010

Happy Anniversary

Hi Friends~

Well it certainly has been a long time since I got on my laptop...going on a full week!  How I miss all of you and my crafting!  My one week off in between spring semester and the start of summer classes sure was a rough one with no crafting involved.  Some of you may have read what's been going on over at my Mom's Blog. For those of you who haven't.....I got the nasty flu bug....it started last Sunday night and by Thursday I was so weak, had such bad stomach cramps that my Hubby and Mom decided that I needed to go into the ER.  So Thursday night I spent 3 1/2 hours in the ER...had an AMAZING doctor who was very nice and gave me an IV and 3 different meds.  When he found out that I was supposed to be a bridesmaid in my cousin's wedding the following day he said we will have you looking great and ready to go to that wedding in no time.  Once I got the IV my hubby said he couldn't believe how good I was looking already.  That was the first night that I slept all night.  Made it to the wedding on Friday, survived the ceremony, the dinner (although I hardly ate anything), and the first part of the dance (however I didn't do any dancing....but my uncle's band was playing so I wanted to listen to them for a little bit).  Yesterday I was very weak...think I may have over done it at the wedding so I rested/napped all day.  My symptoms still aren't going away so I will most likely be making a trip to my regular doctor tomorrow probably for more tests.  However, today I am hoping to get a little bit of crafting time in....I'm feeling up to sitting at my desk for the first time in a week. So that is why I have been MIA!!!!

Onto some fun crafty news for you!  Susana has some fantastic blog candy over at the store blog that you don't want to miss!  AND on Friday you don't want to miss the Summer Time Fun Release by Victoria Case for SCACD!  You are going to love this AMAZING set!!!!  The whole set is adorable and there is a bonus that you get when you purchase the whole kit....you get TWO bonus accessory stamps!  How awesome is that?!!!

Today I would love to share the Anniversary card that I made for my hubby (thank god I got this finished before I got sick!)
 I used Day Dreaming by Elisabeth Bell for SCACD.  As soon as I saw this cute stamp I knew i wanted to make an easel card and I used the color of my hubby's garage so it looked like I was looking out the window of our "someday" house! :)
This cutie was colored with my Copics.  I've used Ultra Fine Flower Soft in both Raspberry Fizz and Sage.
I've used my MS deep edge border punch to create my white picket fence.  Roses are Prima Mini Roses.  Copic Colors YG95 and YG97 were airbrushed used my ABS to create more of a "grass look" on the piece of green cardstock.  Airbrushing was also used to create a shadow effect behind the tree.
The tree was hand drawn by me.  Then I made a stand for the back, used my leaf punch and arranged the leafs and finally added a cute heart with a B & K which stands for Brent and Kim! :)
My window shutters with sprayed with Tsukineko Psst Shimmer Spritz in Sheer Sparkle.  I love the sparkle and shimmer you get from this fabulous spray!  Window pane was painted with Adirondack Pearl Paint.  Then Diamond Glaze was added to the windows for that real glass look.


Here are two more views so you can see the dimension in the card.  If you click on each picture it will make them both bigger.


I hope you have enjoyed this card!  I loved making it!!! Don't forget to head over the SCACD blog to check out that blog candy!  Susana also has added some WONDERFUL products over this past week that I have been away from blogland! She is now carrying Maya Road Mini Chipboard Sets, Lumiere Mini Paint Sets, and the much loved Tsukineko Psst Frost Spritz and Vanilla Smooch Spritz are now back in stock! Happy Shopping!

Recipe:
Stamps: Day Dreaming by Elisabeth Bell for SCACD, Teeny Tiny Wishes (SU)
Inks: Memento Tuxedo Black, Copics, White Gel Pen, TH Distress Ink Weathered Wood, Adirondack Pearl Paint,
Copic Colors Used: E000, E00, E11, E15, E21, E25, E29, YG95, YG97, YR00, YR21, YR24, Y23, B91, B93, B95, B97, R02, W03, RV10, RV17, RV32, RV34
Papers: SU Cardstock
Tools:  Copic ABS, MS deep edge border punch, SU modern label and word window punches, EK Success Leaf punch, heart punch, Cuttlebug Distress Stripes Embossing Folder,
Embellishments: Ultra Fine Flower Soft in Raspberry Fizz and Sage, Prima Mini Roses, Tsukineko Psst Shimmer Spritz in Sheer Sparkle, Diamond Glaze,

♥ Thanks for stopping by! ♥

Photobucket

Friday, April 23, 2010

April Showers Bring May Flowers!

Don't forget to enter my blog candy -->here<--.

Whenever we have rain in April it always brings to mind the saying that "April Showers Bring May Flowers!"

This is the birthday card that I made for my Gram and I promised to share with you!  I decided to make her a flower pot card with some fun handmade 3D flowers!  (Maybe you remember -->THIS<-- flower pot card I made for my Mom last year.)  This only difference is the 3D flowers.....this time I used the flower tutorial from Dawn's video...they were so fun and easy to make!  I used my Cuttlebug embossing folder to add some texture to the flower pot, and then used my MS pansy border punch and added some pearls to the middle....now that I have my Viva Decor Pearl Pen I can use that to customize pearls on all of my projects! 

Here you can see the inside of the flower pot card.  I've added Susan from Elisabeth Bell Sampler Edition 1 for SCACD.
 Here is a close up of Susan.  She of course was colored with Copics and accented with a white gel pen.
Here is a close up of the 3D flowers.  I used two different kinds of dp for them.  Then added LOTS of Star Dust Stickles for tons of sparkle!  The extra filler flowers are Prima Hydrangeas.

And the final view is a side view so you can see all of the dimension.  Here you can also see the stand that I made so this card can be displayed easily.  I hope you've enjoyed this creation!  I'm entering this card into the following challenges:
A Spoonful of Sugar - Happy Birthday
Simon Says Stamp - Things with Wings (all the butterflies)


I also have some FUN NEWS to share with you.....there is a
New release for SCACD coming soon!!!
I hope you are ready to walk on Sunshine!!!
Make sure you check back soon for more details!

Recipe:
Stamps:  Susan from Elisabeth Bell Sampler Edition #1 for SCACD,
Inks: Memento Tuxedo Black, Copics, White Gel Pen,
Copic Colors Used: V000, V09, V12, V15, V17, E000, E00, E11, E21, E99, R02, B000, B52, YG03, YG06, YG07, YR00, YR24, Y000, Y21
Papers: Misc. papers from my stash.
Tools: MS Hydrangea punch, MS leaf punch, Flower punch, MS pansy border punch, Cuttlebug Embossing Folder,
Embellishments:  Star Dust Stickles, Hydrangeas (Prima), Pearls, Ribbon and Tulle from my stash.

♥ Thanks for stopping by! ♥

Photobucket

Friday, February 12, 2010

EIO Friday Challenge - Bling It Up!

Today I am hosting the Friday Challenge over at Embellish!  This week's it's all about BLING....sparkles, shimmer, anything that shines or glistens!  Your challenge is to make a card/layout/creation using at least 2 TYPES OF BLING!!!  Click -->here<-- to participate!  I'd love to see what you come up with!

I've again used the Pink Paislee Cupid papers....are you getting sick of seeing them yet?  I absolutely love them...must be because there is pink and brown in the collection...hee hee!  For my bling I have used rhinestones and stickles.  Rhinestones are in the MS border and of course the big rhinestone flower.  Then I went crazy with my star dust stickles and it ended up all over this card....on the flowers, the ruffles on Tilda's dress and hair bows, and along the edge of the sentiment tag. This card is nice and sparkly!!!

Tilda of course was colored with Copics and accented with a white gel pen.  I also used my gel pen to doodle the dots on the scalloped circle...I love how it made the dark brown scallop pop!

I wanted my cherry blossom to match Tilda's dress so I took my Copic ABS and used R20 and R22 to change my white cherry blossom to pink!  Now it's a perfect match!  I do LOVE my ABS!!!!
From this angle you can see all the star dust sparkling away!  You can also see that I embossed the blue panel behind Tilda with my brand new Cuttlebug mini hearts folder!  I can see using this one a lot! Those heart as soooo cute!

I hope you have a wonderful Friday and a great weekend!  I just got my new WOJ City Girls in the mail yesterday so I can't wait to ink them up and play play play all weekend!!!

Recipe:
Stamps:  Sweet Tilda (Magnolia Raising the Ceiling Collection), Tiny Tags (SU)
Inks: Memento Tuxedo Black, Copics, White Gel Pen,
Copic Colors Used:  E00, E11, E21, E25, E29, E31, E50, E53, YR00, B0000, B000, B12, R000, R02, R11, R20, R22,
Papers:  Pink Paislee Cupid Collection
Tools: Spellbinders - Circle, Scallop Circle, EK Success corner punch, MS border punch, MS tag punch, heart embossing folder (Cuttlebug),  Copic ABS,
Embellishments: Rhinestone Flower (Kaiser), Clear Rhinestones, Star Dust Stickles, Roses & Cherry Blossom (Wild Orchid Crafts)

♥ Thanks for stopping by! ♥

Photobucket

Sunday, January 24, 2010

Blowing Kisses to You!

Today I had to clean my craft room because my desk was so messy I didn't have any room to create!  After I got it clean I messed it up again...hee hee!  I again wanted to make some non-traditional Valentine cards (trying not to use any red) and I succeeded in making 2 cards like this!  One I'm sharing tonight and the other will be on Tuesday!  Tomorrow is my normal day for posting my Embellish-Online project; however, I will be gone all day with hubby so I'm posting tonight! :)  I'm sure you don't mind!  Tuesday I head back to school....ICK....I was having so much fun being on break....but ONLY 1 1/2 more years and I will be DONE...I'm FINALLY seeing a light at the end of the tunnel!

So during my play time today, I decided to play along with the Whiff of Joy Challenge which was to use either of their 2 challenges....I went with the challenge of 3 design papers, 2 bling, and 1 flower!  WOJ challenge is also looking for DT members so this is also my try-out for their DT!  I would LOVE to be a member of their challenge blog because then my WOJ stamps would get more love and use!!! :)  I also used the Quixotic Challenge which was to ink up an old stamp!  Melinda blowing kisses was my VERY first WOJ stamp that I bought and she is still ranked toward the top of my favorites!


First I want to apologize for the pictures....I had to use the Ott Lite again.  I recently purchased Distress paints in Tattered Rose and Picket Fence so I tried out my hand at distressing my papers.  I like the shabby chic look this gives!  My hubby said the papers look dirty...what do men know! Gesh!  Lol!  Papers used are American Crafts Blue Skies collection which you can find --> HERE<-- at EIO!  Barb still has free shipping on orders over $50, just enter code 4SP9HD in the coupon box at checkout...and be sure to tell her I sent ya!

Here is a close-up of Miss. Melinda.  She was colored with my Copics and Spicas.   Diamond Stickles (bling 1) make her wings sparkle!  I gave her a shadow with small dots (you can see this to the left of her).  I idolize how Chris and Crissy both use this type of technique for shadowing/backgrounding so I wanted to give it a try.  Mine turned out nothing like theirs....but I am going to keep practicing...maybe in a million years I might be able to do it like the girls! 

Here is my hand created flower with a prima bling center (bling 2).  I've seen many of my blogging friends use their MS punch on the edge of flowers which gives such a unique look.  Thanks for the inspiration girls!

For my heart I used my heart nestie and then used a small Cuttlebug embossing folder.  I really love the colors of this card...and I am sure you will see lots more Distress Crackle Paint on my blog in the near future! :)

I hope you have a great week!

Recipe:
Stamps:  Melinda Blowing Kisses by Whiff of Joy; Love Sentiment from Gram (Thanks Gram!)
Copic Colors Used: R02, R11, R20, R32, R35, R37, BG10, BG11, BG13, YR00, E00, E11, E13, E15, E17, E21, E27, E29, E33, E53, Spicas - Clear (on pant swirls), Lipstick (on heart necklace & bracelet), Blossom (bracelet), Gold (belt buckle), Chocolate (over Love Sentiment)
Tools: MS border punches, MS deep edge punch, Spellbinders - Heart, Labels 4 nesties, Lg. Retro flower punch, EK Success swirl punch, MS tag punch, Cuttlebug Embossing folder
Embellishments: Distress Paints - Tattered Rose and Picket Fence, Diamond Stickles, Prima Bling Center


♥ Thanks for stopping by! ♥

Photobucket

Monday, November 16, 2009

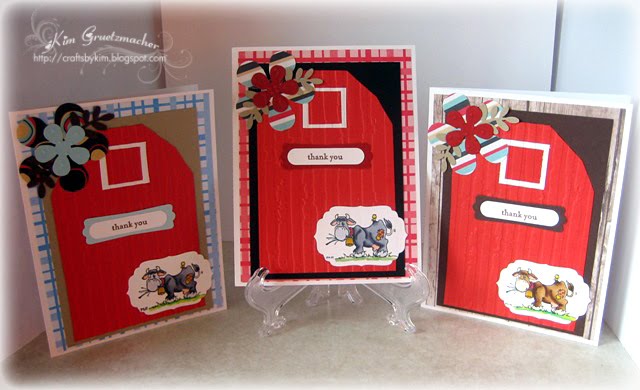
Barnyard Thank Yous

Hello Everyone~
I hope you are all doing wonderful! Things are pretty good here...I'm counting down the weeks to the semester....I will be so happy when it's Christmas Break....look out craft-time then! Sorry I've been missing the past week! My hubby totally surprised me this week and said that when I am on break of school we can move the bowflex out of our spare room and I can take over the area for my crafts! Woo-Hoo....well I COULDN'T wait for break and talked hubby into moving it this weekend so I have been busy re-organizing my craft space! I am so happy to have more room! I will definitely post pictures once I am done! My FABULOUS Mom came over and helped me yesterday....we had lots of fun....my Dad and hubby watched the NASCAR race...and YAY my driver won!

Don't forget to check out my
Blog Candy For A Cause! You still have time to enter!

Today I want to share some special Thank You cards that I have created. My parents' friend's farm burned down this summer. Thank goodness they only lost one cow in the fire, but their barn was a total loss. They are now in the process of rebuilding. My parents' friend asked me if I would make her some thank you cards....she wanted something "handmade" and "special" to sent to people who helped them out....I felt so honored that she asked me to make the cards for her. The only thing is wanted was something with a farm theme. And this is what I came up with:
I hand drew the barn, cut them out, ran them through my Cuttlebug with the Distressed Stripes embossing folder to give them a "barn" look. Then I matted them on cardstock and dp. I wanted to keep the layers simple and keep the whole card flat so that they could be mailed without extra postage. Although keeping them simple was definitely hard for me when I am used to always adding dimension to my cards! lol!
The flowers were punched with my Retro Flower punches, and my EK Success Leaf punch. The medium sized flowers were again run through my Cuttlebug with the Swiss Dots embossing folder. The cute cows were colored with my Copics and cut out with my Labels 4 nesties.I made 3 different designs, one in blue, one in brown, and one in red. I really like how they turned out. I hope that my parents' friend loves them too!
Recipe:
Stamps: Cow Stamp from my Grandma (I don't even know who makes it)
Inks: Copics; Momento Tuxedo Black
Papers: Nennah Smooth Classic Crest, DCWV dp; cardstock from my stash
Tools:
Scor-Pal (to fold my cards), Tonic Cutter, Spellbinders Labels 4 Nesties, Retro flower punches, EK Success Leaf punch, Distressed Stripes & Swiss Dots Cuttlebug embossing folders, SU window punch & label punch,
Embellishments:
n/a
Thanks so much for stopping by!

Photobucket

Monday, November 9, 2009

Another EIO Monday

Hi Everyone~

It's another Monday....and that means it's my weekly Embellish post! Today I decided to share a baby card with you! I used American Crafts Baby Collection and Backyard Collection papers for this card. The flower/bow on the top was made with May Arts Ribbon, Ric Rac, and Imaginisce flowers. The center rhinestone is a Prima Say It In Crystals. I used my circle nesties, along with Martha doily lace punch and Cuttlebug Diamond in the Rough embossing folder to create the bassinet that baby is laying in. Baby was created with my circle and scallop circle nesties. I used Neenah paper for the face, and then colored it with my E00 and R83 Copics, and used my Copic multiliner to draw the face.

I just adore how this creation turned out! :) Don't forget to check out all of the specials that Barb has going on over at Embellish!

This week it's Michelle's turn to pick the sale for a week! She picked Stampavie so Barb is offering an ADDITIONAL 10% OFF of her already LOW prices on Stampavie stamps from 11/07 - 11/14! Check out all of the images here!

Get Free Shipping on domestic orders of $50.00 or more! Enter code 4SP9HD in the coupon box at checkout! (One discount per order)

New Frequent Buyer Club! For every $5.00 in purchases you'll receive 1 point. Collect 30 points and you'll receive a voucher for $15.00 off on your next purchase!

Great Sale on Select Basic Grey 12x12 Collections, Select Pink Paislee and Imaginisce! Prices from 20 to 35% off!

Recipe:
Stamps: Teeny Tiny Words
Inks:
Copics, Copic Multiliner
Papers: Nennah Smooth Classic Crest, American Craft Baby Collection & Backyard Collection
Tools:
Scor-Pal (to fold my cards), Tonic Cutter, Spellbinders Circle & Scalloped Circle Nesties, MS Doily Lace border punch, Cuttlebug Diamond in the Rough embossing folder, MS tag punch
Embellishments:
May Arts Ric Rac and Ribbon, Imaginisce Flowers, Prima Say It In Crystals Center, Tulle, Roses, Diamond Stickles, Pearls, Baby charm from my stash.


I want to send a special thank you to everyone who is coming forward with donations to my Blog Candy for a Cause! You are all amazing and wonderful people! Please make sure to check THIS POST as I am updating the candy list daily!


Thanks for stopping by!

Photobucket

Monday, October 26, 2009

EIO_Spotlight on Eskimo Kisses!

Good Morning Friends~

Hope you all had a wonderful weekend! Mine was AMAZING! My Mom and I took a mini vacation to the Rubber Stamping and Scrapping Expo that was in Milwaukee, WI! We had so much fun and bought lots of new goodies to play with....now to find some time to play! :)

Today I am sharing some creations that my Mom and I made with the new BG Eskimo Kisses line! These are mini purses that we made for some craft shows that we have coming up in the next few weeks! Each purse was cut with the top note die, then embossed with an embossing folder and embossed with ultra thick clear embossing powder to add lots of shine! These purses look like real purses! Then we added embellies and chain for the handles.

Here are some close ups of them so you can see the embellies better! :)

I hope you have enjoyed these cuties! We have made 11 of them in our hotel room! It was such a blast! If you are interested in purchasing one, please contact me HERE! :)

Don't forget the amazing sales that are going on at Embellish!

Get FREE SHIPPING on domestic orders of $50 or more by entering code 4SP9HD in the coupon box during your checkout!

NEW FREQUENT BUYER CLUB! For every $5 in purchases you'll receive 1 point. Collect 30 points and you'll receive a voucher for $15 off your next purchase!


Also while supplies last....Get a FREE HOCUS POCOUS CHIPBOARD THICKER ACCENTS when you order any Hocus Pocus Letter Thicker!

You can get to the Embellish Store by clicking on the link in my sidebar! Make sure you tell Barb that I sent you! :)

Recipe:
Stamps: N/A
Inks:
Versamark
Papers: BG Eskimo Kisses Collection
Tools:
Scor-Pal, Tonic Cutter, SU Top Note Die,
Embellishments:
Chain from Michaels, Velcro, Gemstone, Spare Parts Brad, Ultra Thick Clear Embossing Enamel, Swiss Dot Embossing Folder, SU flower Embossing Folder


Thanks for stopping by!
Enjoy your week!

Photobucket

Monday, October 19, 2009

Haunted Pumpkin Patch

Hi Everyone~

Are you ready for Halloween yet? I have lots of candy....but not sure if it will last until Halloween because somehow those darn pieces of candy keep finding their way into my tummy! lol! Today I have a NON-Stamping 3D card for you! I had so much fun making this one!

All papers used are from the Pink Paislee Twilight Collection! I love these papers as much as I love the Twilight Book Series! I am a HUGE Edward Lover now...Shhhh don't tell my hubby! Hee hee! I began reading the series maybe a month ago and am already on the 4th book! Just started it yesterday and I can't put it down!!! I also bought the DVD Saturday and can't wait to watch it...I had to read the book before I could watch the DVD! If you love these papers, then you NEED to get to EIO today because they are the weekly special:

Buy any 3 Pink Paislee paper get 1 FREE! Be sure to leave the free one's name in the comment section to receive it. Do not put it in your shopping cart.

Now here is a close up of my 3D pumpkins! I love how they turned out! I will have a tutorial coming soon showing you how to make these pumpkins and ghosts yourself (hopefully will have them posted later this week)!

And here is a close up of Mr. Ghosty!And don't forget about these offers that Barb has going on over at EIO:

Get FREE SHIPPING on domestic orders of $50 or more by entering code 4SP9HD in the coupon box during your checkout!

NEW FREQUENT BUYER CLUB! For every $5 in purchases you'll receive 1 point. Collect 30 points and you'll receive a voucher for $15 off your next purchase!


Also while supplies last....Get a FREE HOCUS POCOUS CHIPBOARD THICKER ACCENTS when you order any Hocus Pocus Letter Thicker!

You can get to the Embellish Store by clicking on the link in my sidebar! Make sure you tell Barb that I sent you! :)

Recipe:

Stamps: None....can you believe that!
Inks:
N/A
Papers: Pink Paislee Twilight Collection
Tools:
Scor-Pal (to fold my cards), Tonic Cutter, Spellbinders Scallop Octagon Nesties, MS Halloween Fence border punch, MS Witch punch
Embellishments:
Tulle from my stash
.

Thanks so much for stopping by!
Your comments truly make my day!

Photobucket

Sunday, October 18, 2009

Rockin' to the BEAT!

Hi Friends~

I hope everyone had a joyous weekend! I had a great one! Saturday I spent the day with my best friend, we went and got pedicures and did some shopping (which included crafty shopping...my FAVORITE!) Today, I had stamp club so getting together with my mom and crafty friends is always a blast! We made some fun cards and a project that I can't wait to share with you! It will be coming up for the ISS Blog Hop! And all I can say is you don't want to miss it!

Today I want to share a Club Anime project with you! This is Corrine, isn't she so adorable listening to her Ipod! I can only image she is listening to 80's music....hee hee! That's my ultimate favorite music. I hand made the background paper that Corrine is popped up on. I used a piece of glossy paper and then took pink and black ink and applied it to the paper with a sponge. Then I ran the paper through my Cuttlebug with my new Victoria folder. I found the music brads at HL and when I saw them I knew they'd be perfect for my 80's lover!
And here is Miss. Corrine again! I used some metallic pink DMC floss to make her headset strings. I've added Crystal Glamour Dust to her earphone and Ipod....a girl needs a sparkly Ipod right?!
Recipe:
Stamps: Corrine by InStyle Stamps
, who is available in the October Club Anime Kit
Inks: Copics
Papers: Neenah Smooth Classic Crest, MME Bella Bella French Flea Market Collection
Tools:
Scor-Pal, Cuttlebug, Victoria Embossing Folder,

Embellishments: Prima & Petaloo Flowers, Glamour Dust, Music Note Brads, Rhinestone flower & stars along with Lace from my stash.

Don't forget about the ISS Stamps and Digi Sale!
Click HERE to read all about it!


Thanks for stopping by!

Photobucket

Sunday, October 11, 2009

Embellish-Online Friday Challenge!

Well it's Sunday which means this weekend is coming to a close! I can't believe how fast the weekends always seem to go! This past Friday I was the host over at Embellish-Online for the Friday Challenge....which is to use Fall Colors on your project (think red, orange, yellow, brown)! Now, what are you waiting for....to play along, click HERE! I can't wait to see your creations!

Below is my creation, which I used the Fall Harvest Stamp set from Stamps and Smiles! I am just loving making these fence cards....and yes I promise a tutorial will be coming soon!

I'm also entering this card in the Copic Creations Challenge this week which is to color pumpkins!

Recipe:
Stamps: Fall Harvest
Inks: Momento Tuxedo Black, Momento London Fog, White Staz-On, Momento Rich Cocoa, Momento Various Blues, Copics
Papers: Nennah Smooth Classic Crest, Kraft cardstock, Fancy Pants All Fall Collection
Tools: Spellbinders Octagon and Scallop Octagon Nesties, MS fall border punch, MS Zig Zag border punch, Cuttlebug Distressed Stripes Embossing Folder, Marvy mini leaf punch
Embellishments: Raffia and Flowers from my stash

Thanks for stopping by!

Photobucket

Tuesday, September 22, 2009

A Flower Pick'n Sneak Peek!

Hi Everyone~

Hope you are having a fantastic week! I have exams coming up in the next two weeks so things are going to be a bit crazy here...but I am really enjoying my classes this semester and I have some wonderful professors! YAY! In between my homework and studying I am still managing to fit in a little bit of crafty time!

Here is a sneak peek of a newbie that is at Club Anime! This cutie pie is Marissa! When I saw her I knew I had to try out making a fence card for her! I wish I could remember where I first saw this fence card...if I find the link I will definitely edit to let you know! :) I hate it when I lose things that I had saved...plus I am a firm believer that credit is due to the original creator!!!


The fence was created with my MS zig zag border punch, cuttlebug distressed stripes embossing folder, momento london fog ink pad, and stazon white ink pad. I absolutely LOVE how this turned out and have another fun project up my sleeve using this same technique !

Marissa was of course colored with my Copics on my new Neenah paper! Gosh I can't get over how much of a difference paper can make when coloring with Copics! I am so glad that I went to certification class because now I love my Copics even MORE with the right paper....and I seriously didn't think I would love my markers more! *Blush*

Here's a close up of Miss. Marissa:

And then here is the finished inside...pretty simple but elegant in my eyes!
Last but not least I have some fun to share with you! Our friend shared with us that you can get your broom to stand up by itself due to the way the planets are lined up, something with the fall equinox or something like that! This has been standing up since Sunday night and still hasn't fell down yet! Crazy! YES!!!! But it seriously is true...no strings attached, nothing holding it up!

Recipe:

Stamps: Marissa from Club Anime by InStyle Stamps; SU Itty Bitty Words
Inks:
Copics Spicas, Copics, Momento London Fog, Stazon On Cotton White, Smooch in Sugarberry (used around small sentiment tag and in middle of retro flowers)

Papers: SU cardstock, and bits and pieces from my stash of scraps

Tools: MS Zig Zag border punch, MS leaf punch, MS butterfly punches, EK Success Small Retro Flower punch, Spellbinders Blossom Nesties, MS tag punch, Cuttlebug Distressed Stripes embossing folder

Embellishments: Prima Hydragea Flower, Prima Roses, and big flower from my stash.

Thanks for stopping by!

Make sure you stop back on Friday as there is the ISS Blog Hop and the Embellish Blog Hop going on! You don't want to miss these *tricks & treats*

Photobucket

LinkWithin

Related Posts Plugin for WordPress, Blogger...