Showing posts with label Stamps and Smiles. Show all posts

Monday, December 13, 2010

WOC #12 - Color Challenge

Welcome to the craziest week of the year for me!  This week is my final exams....5 exams to take and one presentation to do!  I'm ready to pull out my hair...LOL!!!  But by Friday afternoon I will be MUCH better!  This weekend I got away from studying for a little bit to go run some errands with my hubby...we pretty much got most of our Christmas Shopping done...which is good because I don't have time this week to fit that in, ha ha!  Last night we also got hit with a MAJOR snowstorm....we got over 14 inches of snow!  YUCK!!!  I really am much more of a tropical girl, than a midwest girl....the snow and cold don't do anything for me...especially when I have to drive in the icky weather...the roads are plated in ice and snow right now....should make for an interesting drive to school!

BUT...on a much better note....today is Wild Orchid Challenge Day!  Woo-hoo!!! This week we are challenging you to ONLY use PINK, WHITE and SILVER on your creations!  I absolutely had a ball with this challenge...if you follow my blog you know that PINK is my ultimate favorite color....my hubby is teasing me and telling everyone that when we build our house it will most likely have pink siding! ROFL!!!  Well maybe not that...but I can guarantee my craft room will be PINK!!!
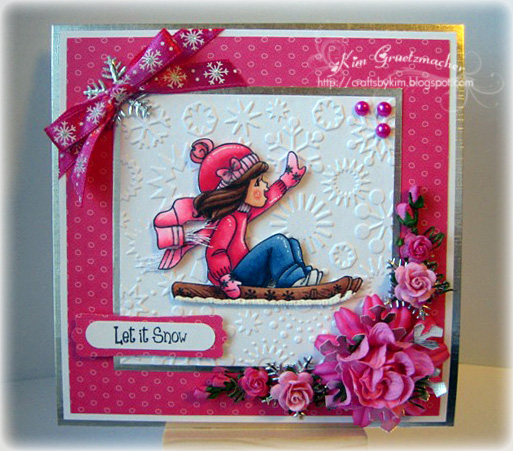
I've used one of the newest stamps over at SCACD for my card today....this is Look Out Below by Elisabeth Bell for SCACD! She comes in the Winter Sampler Collection...and I have to tell you I absolutely LOVE this set!  The pink paper is from the Bo Bunny Doodles collection, which was matted with white cs and silver metallic cs.  The panel that this cutie is popped up on has been embossed with my Cuttlebug snowflake folder and then the panel was spritzed with Maya Road Iridescent Pearl Mist!  OMG do I LOVE the pearl-essence effect that this mist gives...it's definitely a must have!!!  The embossed panel is accented with 5mm Self Adhesive Pearls from Wild Orchid Crafts....love the range of colors they have available!  The bow was made with my fantastic Bow Easy...this seriously is an amazing product to have...I haven't made a bow without it since I bought mine almost 2 years ago!
Of course this cutie pie was colored with Copics and accented with a white gel pen.  The pom pom on her hat, bow on her hair, snowflakes on her mittens, boots, and scarf have been accented with Illuminate Smooch!  The tassels on the end of her scarf were made with some embroidery floss. Then to make it appear as if she is sledding down a hill I added some Liquid Applique to the bottom of her sled.
Flowers are from the fabulous Wild Orchid and consist of: a pink Gardenia which has been placed on top of a punched silver snowflake and then layered on to a NEW flat bloom (which WOC has just gotten into the store...you get a HUGE assortment in each collection), the 15mm roses have been layered onto of padded silver snowflakes (I totally am in love with these!!!!), and the arrangement was finished with 10mm roses and 5mm closed rosebuds.  Flowers have been accented with 3mm self adhesive pearls in pink.

I hope you've enjoyed this cutie!  Make sure you check back in a little bit because I will have my Make A Mess Monday post up for you....and you are NOT going to want to miss this one....we are talking a girl's best friend here!!! :)

Recipe:
Stamps: Look Out Below by Elisabeth Bell for SCACD from the Winter Sampler Collection, Tis the Season to be Jolly (Stamps and Smiles)
Inks: Memento Tuxedo Black, Copics, White Gel Pen,
Copic Colors Used: Hair: E25, E49, E53, E59, Skin: E000, E00, E11, Shading: W3, Boots: W00, W1, W3, Hat & Sweater: RV00, RV13, RV14, RV21, RV25, Jeans: B91, B93, B95, B97, B99, Scarf & Mittens: RV00, RV13, RV21
Papers: Bo Bunny Doodles Collection, American Crafts Metallic Cardstock, White cardstock
Tools: MS snowflake punch, Bow Easy,
Embellishments: Maya Road Iridescent Pearl Mist, 5mm Self Adhesive Pearls, a pink Gardenia, NEW flat bloom, 15mm roses, padded silver snowflakes, 10mm roses, 5mm closed rosebuds, 3mm self adhesive pearls, Illuminate Smooch, Liquid Applique,

♥ Thanks for stopping by! ♥
Photobucket

Friday, September 17, 2010

TIOT 84 - Anything But a Square

Happy Weekend!

I hope you are having some fun this weekend!  WOW another week of school has gone by!  This semester sure is flying by....must be because I am really enjoying my classes!  However, with a busy week full of homework means not a lot of crafty time. :(  I did finally get my TIO*T* card done for this week! YAY!  Suzanne has challenged us to create a card that is ANYTHING BUT A SQUARE!  Oh I love making fun shaped easel cards!!!  So I grabbed my SB Labels 11 and went to work!
The cutie on this card is one of the new Animapeeps from the newest Elisabeth Bell for SCACD collection....her name is Just Ducky.  Speaking on NEW....I have a bunch of NEW goodies on this card!  The wonderful papers are from the Cosmo Cricket Mitten Weather collection.  These papers are so beautiful....there are gorgeous holiday papers in here as well as papers that can be used for any occasion, like those that I've used on this card.  And my FAVORITE new tool  that I have used on this card is the Epiphany Crafts flower button maker!  See those oh so cute flower buttons....I made them myself with the papers from the Mitten Weather Cosmo Cricket collection!  I love how easy it was to make buttons that matched my project perfectly!  These makers are a dream to use, SUPER easy, and MEGA fun!  I think it took me less than 2 minutes to make both customized buttons!  You seriously need to get one of these!  I can't wait to use my solid round one now! :) 
Isn't Just Ducky so adorable?  She seriously is a dream to color!  I've colored her with Copics and and then accented her with my TonerTex Pen and have used Diamond Glaze on her eyes.  I've used the TonerTex pen and Glitters on her hair bow and boots.  Then this sweetie's umbrella was accented using the TonerTex pen and Foils.  Love the holographic foils, they are so gorgeous!  Here you can see a close up of the Epiphany button too!
The bottom of the card holds a sentiment so this card can be used for any occasion, and again showcases the Epiphany button!
Finally, a side view to share the dimension and shine with you.  The umbrella has been double popped up so that it sits higher than Just Ducky.  I hope you have enjoyed my Anything But a Square card, make sure you head over to the SCACD Blog to see what my DT Sisters have made!  I hope you come back soon, as I have some more goodies to share with you soon!

Recipe:
Stamps: Just Ducky by Elisabeth Bell for SCACD, Sentiment (Stamps and Smiles)
Inks: Memento Tuxedo BlackCopics,
Copic Colors Used: Ducky: E000, E50, E51, E53; Eyes: B0000, B01, B04; Beek: YR12, YR16; Clothes, Boots and Hair bow: BV0000, BV11, V93, V95; Umbrella: BG0000, BG10, BG11; Shading: W1, W3
Papers: Cosmo Cricket Mitten Weather Collection
Tools: SB Labels 11, Epiphany Crafts Flower button maker, EK Success leaf punch,
Embellishments: Diamond Glaze, TonerTex pen and Glitters and Foils,

♥ Thanks for stopping by! ♥
Photobucket

Friday, August 27, 2010

Stamps and Smiles Blog Hop

Welcome to the
Stamps and Smiles
August Release
Blog Hop

I hope you have enjoyed the samples of all the sets this week....I had a lot of fun creating them to share with you...and can't wait to create more projects....as the ideas are floating through my head...there are so many uses for these stamp sets!  

I hope you are having fun along the blog hop!!!  If you are here from Jennifer's blog then you are in the right stop and hopefully are adding all the amounts in the piggy banks as you go along.  If you happened to drop in, please head to the Stamps and Smiles Blog to start at the beginning on the hop...there are fun prizes to be won!  Now onto my piggy bank: 
Oooo that's almost enough to buy a new stamp set from Stamps and Smiles!!! :)  Yippy!!!

Now let's get onto my fun Blog Hop project...seeing how we are thinking piggies I thought I would share the lovely piggy bank set that I created.
I've used both of the Money Pig #1 and Money Pig #2 stamp sets for this fun project!  This set is a handmade piggy bank along with a matching card.  Papers are from the Basic Grey Oliver Collection
Here is the card using Money Pig #1.  Yesterday I have created a "Girl" version of this card....here is the Boy version using the stamp set! :)  Aren't those coins adorable too...those come in the stamp set!  Awesome or what?!  I love this sets to pieces!!!  I know you probably are sick of hearing me say that all week!  hee hee!
Piggy was colored with Copics and accented with a white gel pen!
And here are the coins again...they also were colored with Copics.
Now for my favorite project of this release....as soon as I saw these piggy stamp sets I knew I wanted to make a piggy bank!  Well I found an old plastic Prima jar and went to town. 
Here you can see the front, I left the lid so that it can still screw off so that the piggy bank owner can get to his/her money!
I used my craft knife to cut a slot in the top....see the money really will go in there....hee hee....I'm go giddy because this turned out exactly as I had it pictured in my head! :)
There's the money in there.  As you can see there is a red strip attached to the botton of the jar...that is a piece of cardboard covered by cardstock....it is so that the jar won't roll away.
And here's how you get your money out of the piggy bank! :)  I've hope you have enjoyed your stop here during our Blog Hop!  Now your next stop is over to Patricia's blog!

In case you get lost...here is the order of the stops:


Kim G (YOU ARE HERE)


♥ Thanks for stopping by & Happy Hopping! ♥
Photobucket

Stamps and Smiles Release - Day 5

Welcome back SAS Friends!! We are on the last day of our Stamps and Smiles samples and giveaways for the NEW stamp release!! Thank you all for stopping by during this fun week...I hope you have enjoyed the samples!  Make sure you stop back tonight from 8 - 9 pm CST for our Blog Hop - One lucky winner will win 5 sets from the NEW stamp release.
 
Now for the last two stamp sets to be previewed!  They are....Little One & Bundle of Joy. All 10 stamp sets will be released TONIGHT after our Blog Hop at 9 pm CST at the Stamps and Smiles store.


Here is my sample using the Little One stamp set!  Papers are from K&Company.
Image has been colored with Copics .   I've taken Star Dust Stickles and accented the moon, cloud, and stars!
I went for the champagne pink look, again with the flowers.  Flowers consist of Curly Wild Rose, 15mm roses, 10mm roses, and Clear Crystal Stems.
Little One has been surrounded by White Flock to give the cloud a nice soft feel.

I've also altered a black photo frame with this fun stamp set.  First I took white acrylic paint and covered the frame.  Then I took my TH Crackle Paint in Picket Fence and used it to distress the frame....love the antique look the crackle paint gives.
Some more Copic coloring done on this image too! :)
Here you can see the sentiment from the set and a close up of the crackle/distressed look.  I hope you've enjoyed this fun project!

Now here are the stamp sets:


**Make sure you set your alarm for the Blog Hop tonight!  It's going to be LOADS of fun...I promise....and I have a special project to share with you!!  8-9pm CST!**

♥ Thanks for stopping by! ♥
Photobucket

Thursday, August 26, 2010

Stamps and Smiles Release - Day 4

Hello everyone.....WOW we are already on day 4 of our BRAND NEW STAMP RELEASE by Stamps and Smiles. So far we have revealed 8 NEW stamp sets, and tomorrow will be our last day of samples and the reveal of 10 NEW sets - WOO HOO!!!  Want more fun and a chance to win more FREE stamps??? Join us tomorrow night for our Blog Hop from 8 - 9 pm CST.  Everyone is invited, AND one lucky winner will win 5 FREE stamp sets from the NEW release.  Now that should make you want to come and have some fun!!!


Today I'm on a mini vacation before my classes start next week!  Hubby is taking me to the Milwaukee Zoo...it's about a 2 1/2 hour trip....we are also going to hit the outlet mall close buy and then stay over night somewhere.  A nice little get away!


Now let's check out the two new sets of stamps for today.....we have Money Pig #1 and Money Pig #2.
This first sample features Money Pig #1....I decided to turn it into a girl buy using the bow from a stamp set that will be revealed tomorrow (oooo a secret...aren't you excited to see what it will be?!)  Then I took my Copic multiliner and drew some extended eyelashes on Miss. Money Piggy to add extra girliness!  Went for the distressed vintage look again...sorry I just can't help myself...especially with having the Distress-It-All makes it soooo easy!  Papers are from the Basic Grey Olivia CollectionGuipure Lace is from the wonderful Wild Orchid Crafts.  Corners have been accented with my Viva Decor Ice White Pearl Pen.
Miss. Money Pig was colored with Copics and accented with a white gel pen.  She's been popped up onto an oval nestie that has been airbrushed with my Copic ABS and then placed on a scalloped oval nestie.  The scallops were accented with my Viva Decor Glitter Liner in Hologram.
Flowers are from WOC and consist of Classic Sweet Rose, two 30mm Wild Roses, 15mm Roses (that started as white and were airbrushed to match the dark blue paper), Aster Daisy, 5mm closed rosebuds (that were also airbrushed).  All flowers (of course *wink*) were glitzed with star dust stickles.
Here you can see all the shimmer and glitz.  Star Dust Stickles was added to Miss. Piggy's bow and collar.

Now onto Money Pig #2....I did a girl and a boy version of this stamp set.  First we will start with the boy card:
Isn't this piggy so cute?  I love these stamp sets!!!  (Oh, did I already say that...hee hee)  I've used the sketch from MMSC68 for this card.  Papers are from the Basic Grey Oliver Collection.
This little piggy has been colored with Copics and accented with a white gel pen (naturally)!  Piggy has been popped up onto a Nellie die, which has been stamped with the 5 cent stamp from the stamp set in Hero Arts Shadow Ink...it's very faint on the kraft cardstock.  Then that die is on a Big Scallop Circle nestie.  My Viva Decor Graphite Gloss Pen was used to add the little pearls along the right side of the die.
To get the nickles to stay within the ribbon I laid my nickels where I wanted them and then poked holes into the paper with my paper piercer.  Then I wove ribbon through the holes to hold the money on the card....it's almost like magic! :)
Here you can see the dimension of the card.

Now for the Girl version of the same stamp set:

I love how you just add a bow and you can make this card for a girl...so versatile!  Papers are from the DCWV Linen Closet Collection.
Miss. Piggy was colored like the rest of the cards.  She's been popped up onto a Nellie die.
Flowers and Pearls are from Wild Orchid!  All flowers have started as white and were airbrushed...on the teal ones I have also used a brown to make them more vintage.  Arrangement consists of a 35mm Wild Rose, 20mm roses, 15mm roses, 10mm roses, and an aster daisy.  Pearls have been placed in corners of card, on corner flourish and on flowers....they are 5mm and 3mm Brown Pearls.
Second flower arrangement!  All flowers have been painted with Illuminate Smooch....first time I put this one flowers and I have to say I LOVE the look it gives!!!
Hopefully from this angle you can see the flowers decked out in the smooch.  It also has been applied to Miss. Piggy's bow and collar! :)  Hope you have enjoyed my piggies!!!

Here are the full version of the stamp sets:


***DON'T FORGET....Today's the last day to sign up to win the Elisabeth Bell candy over at SCACD!  Click -->HERE<-- to go and enter....plus don't forget to check out the sneak peeks over there!!!***

♥ Thanks for stopping by! ♥
Photobucket

Wednesday, August 25, 2010

Stamps and Smiles Release - Day 3

Hello SAS Friends!! Thanks for stopping by!  If this is the first time you are stopping by, we are on day 3 of our stamp release. We have 10 BRAND NEW STAMP SETS, with 2 NEW sets being revealed each day this week!

So are you ready for Day 3 previews?  I absolutely love all of the new sets but these two sets today are near and dear as I am a total flower girl....even though I can't grow or keep flowers alive to save my life...but I love how beautiful they are!  Today we are sharing Martha Flower Set and Rose Flower Set!

First I will share my sample of Martha with you:
This card was made with the help of a VERY SPECIAL Girl!  During CHA, I got to stay with Jennifer (the owner of Stamps and Smiles) and her family (thanks again hun!!!)....and while I was there we of course had crafty time.....Jennifer's daughter Hannah helped me create this card!  I had her pick the colors she wanted me to use...she wanted PINK, ORANGE, and YELLOW!  So that's the story behind this card and how I ended up with a very colorful Martha...and I have to say I LOVE the color combo!!!!  Thanks so much Hannah for the wonderful help hun...you are the BEST!!!  Papers are from the Cosmo Cricket DeLovely collection.  Corners were accented with my Viva Decor Ice White Pearl Pen.
Martha was colored with Copics and accented with a white gel pen!  She was cut out with a SB circle and layered on a SB scalloped circle.  Diamond Stickles was added to the main flower on Martha.
These flowers were made using the scalloped circle punch and then accented with more Diamond Stickles!  On the orange flower I used only cardstock, and on the pink flower I used a mix of cardstock and dp.
Here you can see the 3D of the orange flower and Martha's hair that has been popped up.  Diamond Glaze was added to Martha's eyes for some shine.
Here is Miss. Hannah....isn't she the cutest!!!  I surprised Hannah and when we were done and told her she could keep Martha. :)  She was all excited and I was so happy she liked it!

Now onto the Rose Flower Set:
For this set I decided to make a sweet gift set.  Don't you just love the sweet basket?  (Thanks to my dear friend Suzanne for her inspiration!!  I adore this girl!!!)  Papers are from MME Home Collection.
Here you can see the card closer.  The pendant that Rose was popped up on is a felt pendant that I got on one of my trips to Michaels.  I saw it sitting in my supply bin and thought that it would make an awesome background for this beautiful flower girl!
Miss. Rose was colored with Copics and accented with a white gel pen.  Then I took Glamour Dust and and edged the petals for lots of sparkle!
Flowers are Primas consisting of Pink Mini Roses and Hydrangeas.
From this angle you can see the sparkle of the Glamour Dust and the Diamond Glaze that's one Rose's eyes.
Then we have this cute basket.  This was made using the same flower stamp sets!  I love all the sentiments that you get with these sets....you can use the flower girls for any type of card!
The top view.
Yep, the basket opens for you to put goodies or a gift card in for someone!  I hope you have enjoyed my samples with today's fun new flower sets!


Here you can see the full stamp sets:

Don't forget about the Stamps and Smiles Blog Hop this Friday, August 27th from 8 pm – 9 pm CST!  Now hop over to the Stamps and Smiles Blog so you can see what my fellow DT members have made with these adorable sets!  AND...Jennifer has a BRAND NEW Daffodil Flower Digi FREE for you today...so now you REALLY have to get over to the SAS Blog NOW! :)  Hurry because this digi is ONLY available for a SHORT TIME!!!!


Martha Card:
Copic Colors Used: E000, E00, E11, E21, Y04, Y06, Y08, W3, YR00, YR12, YR15, YR16, R02, YG00, YG03, YG06, G07, RV02, RV04, RV06, RV09, RV14

Rose Card:
Copic Colors Used: E000, E00, E11, E21, E99, G03, G14, G19, W3, RV23, RV25, RV29, R02, R11, YR00, YR24, Y21

♥ Thanks for stopping by! ♥
Photobucket

LinkWithin

Related Posts Plugin for WordPress, Blogger...