Saturday, June 19, 2010

Big News!

I am so excited to share this amazing news with you...some of you may have seen 
that I have a new banner in my DT column!
I've been asked by the amazing Paul and Siri at Wild Orchid Crafts 
to join their new Design Team!!! I'm on top of the world excited about this awesome adventure!!!
 
WOC has a fantastic range of Mulberry Paper Flowers along with a whole lot of other beautiful craft items - with great prices and great service!! 

I'm so exited and honored to be chosen to be a part of this amazing team, and am looking forward to working with these amazing products....as you know I always have WOC flowers on my cards! :) 
I'm definitely looking forward to working along side of the 7 other extremly talented DT memebers!
 
Stay tuned for more news about WOC and the DT to come in the near future!
 
♥ Thanks for stopping by! ♥

Photobucket

Friday, June 18, 2010

The SECRET is Out!

EXTRA....
EXTRA....
READ ALL ABOUT IT.....

Here is some great news from our wonderful Susana, owner of SCACD:

Another amazing release by Elisabeth Bell for SCACD is coming June 25th!!!
All I will say is these stamps are so wonderful! No sneak peeks allowed, so you will have to come by the store to see these :o) I tell you these are over the moon!!!

Did I mention 4 chances to win the NEWEST Sampler Edition #5!!!  How Yummy is that Blog Candy and how good those chances to win :o) The Candy starts on the 20th so you will need to come back here to the -->Store Blog<-- on the 20th to see the mystery question which is all that is needed to enter. One entry per person please.

Did I mention not only our DT but another Fabulous DT is joining us for the Release Hop PLUS guests!!!

You DO NOT want to miss out on what's being offered at the SCACD store the 25th!!! 


What a GREAT Secret to tell you all about on a Friday!!!

♥ Make sure you scroll down to see my VIVA project from today! 
Thanks for stopping by! ♥

Photobucket

VIVA - NOT Just for Paper!

Alright...I have a quick post for you today....because I have to get my research paper done for my computer science class...it's not due until Monday...but I want it DONE so I am free for the weekend...then I can stay in my craft room all weekend!  hee hee!

The other night my parents, my sister, and my hubby and I went out to eat for my Dad's birthday!  When we were leaving the resturant my sister was sad because she noticed that one of the pearls fell out of her brand new earrings!  When she showed me I knew IMMEDIATELY that I could fix it for her! 

Here is a picture of the "broken" earring!  Sorry about the quality of the picture...I took the picture with my phone and it was the only before picture that I took.  Here you can see the earring on the left hand side is missing the big pearl in the middle.

VIVA Decor to the rescue!  

The next day I grabbed my Viva Decor Pearl Pen in Cream and made a layer where the pearl was supposed to be.  I let that dry and then added another layer building up the pearl to match the depth of the other earring.  In this after picture you can see the "new" pearl in the earring.  The VIVA pearl earring is on the left hand side.  I love how beautiful the VIVA pearl looks!  Now no one will ever know my sister's earring was "broke!"
Here is a close up of the VIVA pearl!  I love the swirled pearl effect that I got by building up the layers of the pearl!  I almost wanted to pull the pearl out of the other earring and redo it! :)  And maybe I just will!!!

Now you know VIVA Decor Pens aren't just for paper....they can be used on ANYTHING!  If you don't have any of these pens....what are you waiting for!  They are amazing!  Click -->here<-- to go get some....and if you have some of these fantastic pens....click -->here<-- to go to the SCACD blog and enter our challenge because this week it's all about VIVA!

♥ Thanks for stopping by! ♥

Photobucket

Thursday, June 17, 2010

TIOT - Viva Style

Happy Thursday my dear friends!  I hope you are having a joyous week!  Today is my final exam in my first summer class...TOOT TOOT!  I'm so excited.....one down and one more to go!  YIPPY!!!

Gimmie a "V".....gimmie a "I"....gimmie another "V"......gimmie a "A".....what does that spell?  VIVA!  This week's challenge over at the SCACD Blog is to use LOTS of Viva Decor Products on your projects!
Today I have a fun card to share with you and it's full of Viva!  If you don't know about the Viva Decor Products....you are in the right place because I have used 3 different VIVA products on my project for today!
 I have used the wonderful Watering Can accessory stamp that is only available in the Hearts and Hugs - Summer Collection by Victoria Case for SCACD!  This stamp is so beautiful and perfect for any type of card!  I have more fun planned later this week with this stamp so make sure you stop back to see what other things you can make with this beauty!  Of course the image has been stamped with Memento Tuxedo Black ink and colored with Copics.
 This is actually an easel card that I made using my Spellbinders Large Big Scallop Square nesties!  The matting has been made using the Large Scalloped Square and Large Square nesties. On the swirls and butterflies you will see lots of pearls...these were created with my Viva Decor Pearl Pens.  I have used the Lilac Pearl Pen on the butterflies and on the swirls I've used my Cream Pearl Pen.
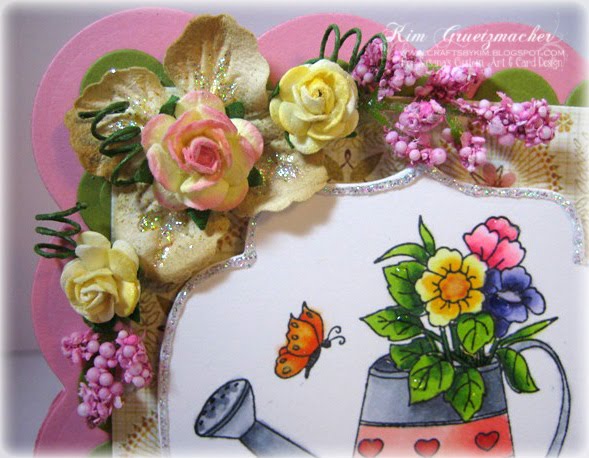
Here you can see my flower arrangement made with a Prima Hydrangea decked out with Viva Decor Glitter Pen (Holo), and Roses from Wild Orchid Crafts.  Along the edge of the image I've also used my Viva Decor Glitter Pen (Holo)...I love how this glitter liner keeps its shape and stands out! 
Here is the bottom of the easel card.  I've used my Labels 9 nestie for the sentiment and again lined with my Viva Decor Glitter Liner (Holo).  The cute bow was of course made with my Bow Easy!  If you don't have this tool you NEED to get it....it's definitely a MUST HAVE in my book!  For only $5 this tool is so worth the money!  I would be LOST without mine!  I absolutely LOVE making bows now!
Finally here is an angle picture of my image.  Here you can see the "dew" that I created in my scene.  I took my Viva Decor Transparent Gloss Pen and added a few small drops on the flowers and leafs to create that "just watered" look.  Then I added more of this gloss to the top of the watering can to look as if the can is plump full with water, and finally finished with a little bit of this gloss on the tip of the spout for the "wet look."  I've also added some Illuminate Smooch to the butterfly, hearts, and centers of flowers for some extra sparkle.

I hope you've enjoyed my project!  Now I can't wait to see your projects with VIVA!!!  Make sure you link your creation -->here<--!

Recipe:
Stamps:  Watering Can from Hearts and Hugs - Summer Collection by Victoria Case for SCACD, Sentiment (Hero Arts)
Inks: Memento Tuxedo Black, Copics,
Copic Colors Used: YR00, YR02, YR04, YR07, YR18, YG03, YG67, N1, N3, N5, C1, C3, C5, G28, BV000, BV02, BV08, Y00, Y13, Y17, RV00, RV21, RV25, R20, R22, R27
Papers: Basic Grey Porcelain Collection, and other Basic Grey from my stash,
Tools:  Spellbinders - Large Big Scallop Square, Large Scallop Square, Large Square, Labels 9, Bow Easy, Sizzix Swirls, MS Butterfly punch
Embellishments: Viva Decor Pearl Pens - Cream and Lilac, Viva Decor Glitter Liner (Hologram), Viva Decor Transparent Gloss Pen, Prima Hydrangea, Roses (Wild Orchid Crafts), Illuminate Smooch,

♥ Thanks for stopping by! ♥

Photobucket

Wednesday, June 16, 2010

WOJ #81 - Photo Inspiration

Hi Friends~

Edited To Add:  I have now updated the pictures so they look WAY better now...I love using natural light much better than my daylight lamp!!!  :)  I've also added details to my card!  Hope you enjoy!

This is going to be a short post, and I apologize!  I was gone for a few days....my hubby had a funeral director's convention in Madison, WI (which is about 3 1/2 hours away from home) and he wanted me to go along with for a few days....so I went along for a mini-vacation.  It was such a nice get away...did some shopping so that is always fun!!!  We just got back last night so I don't have a lot of time to write up this post...have school today, and a final exam for my first summer class tomorrow (eekkk)!  I will definitely come back later today and add more photos and information! :)

It's been two week's again so that means we have another fun filled WOJ Challenge!  This week we have a photo inspiration challenge! These challenges are so fun to see the different ways people can interpret the same photo!
 Here is my card which I am not happy with the picture....so I will be taking a better photo and sharing it with you later today!  I have used a Norma Fickel stamped called Strawberry Girl!  Isn't she so cute?!  I love all the big spaces of the gnomes to color and blend!
Here is the fun photo where you can get your inspiration for our fun challenge.
Here is a close up of Miss. Strawberry!  I colored her with Copics and Copic Spicas.   She's been cut out with my Octagon Nesties (which they happen to be 25% off at SCACD right now!) as well as the poka-dot paper behind her.  The large square was cut with my Big Scallop Square Nestie and then I used Platinum Stickles to outline it.
Flowers are all from Wild Orchid Crafts!  I have used 10mm open roses, 4mm closed rosebuds, and a white Gardenia that I used my Copic ABS and airbrushed it to match the color scheme of my other roses!
The strawberry charm was silver....Did you know that you can color charms with your Copics?!  If you didn't now you know you can!  I love my copics because you can color ANY type of material to match your colored image! 

I hope you enjoyed the edited pictures/post! :)  I do hope that you will join us in our photo challenge, as I look forward to seeing your wonderful creations!

Again, I will be back later today to add better and more photos along with details of this card! :)

Recipe:
Stamps: Strawberry Girl (WOJ), Teeny Tiny Wishes (SU)
Inks: Memento Tuxedo Black, Copics, White Gel Pen, Buttermilk Spica, Black Spica,
Copic Colors Used: R12, R14, R17, R27, R81, R83, R85, YR20, YR21, YR23, W3, B0000, B00, B02, E000, E00, E11, E21, E35, YG03, YG07, YG17, G00, G03, G07, G28
Paper: K&Company
Tools: Spellbinders - Octagon Nesties, Big Scallop Square, SU word window punch & modern label punch, EK Success Border punch,
Embellishments: Platinum Stickles, Roses - 10mm open, 4mm closed rosebuds & Gardenia Flower (Wild Orchid Crafts), Strawberry Charm, Viva Decor Glitter Liner Ruby, Lace from my stash.

 ♥ Thanks for stopping by! ♥

Photobucket

Thursday, June 10, 2010

To Dad....From the Gang!

Happy Thursday!  I hope you are all enjoying your week...my first summer class is coming to a close next week...then only one more to go this summer!  YAY!  Today's my day for Try It Out Tuesday/Thursday over at Susana's Custom Art & Card Design.  This week's challenge is to create a project for Father's Day....and of course use a stamp from one of the lines that Susana carries in her store.  You can find them, -->here<--.
 For my card I have used A Puppy is Love stamp from the newly released Hearts and Hugs Summer Collection by Victoria Case exclusively for SCACD!  I tried this fun Wood Frame Technique by Michelle, but I turned my version into a card.  The wood frame was made with my Labels Eight nesties, Oval nestie, and distressed stripes Cuttlebug folder.  Once the panels were embossed I went over each panel with TH Distress Inks in both brushed corduroy and walnut stain to give it that wood look.
This cutie was colored with my Copics and accented with my white gel pen.  I went over the little girl's eyes and both puppy dog's eyes with Diamond Glaze for the real life look.  The baseball has been accented with a Red Spica to add a little bit of sparkle.
On the inside you can see I used two sentiment stamps that were stamped in Memento Rich Cocoa to create a wonderful greeting and added a rhinestone paw print to go along with the puppies in the image!  This card can be "From the Whole Gang....doggies included!"
 Here is another view so that you can see the dimension from the embossing.  I hope you have liked this fun project!!  Make sure you head on over to the SCACD blog to see what the other girls have made, and of course to join in on the fun challenge.  You can link your Father's Day creation -->here<--.


Recipe:
Stamps: A Puppy is Love by Victoria Case for SCACD, I count you twice (Stampabilities), Well Scripted (SU)
Inks: Memento Rich Cocoa, Memento Tuxedo Black, Copics, White Gel Pen, Red Spica,
Copic Colors Used: E000, E00, E11, E21, E50, E53, E57, E59, E99, YR24, Y21, V000, V01, V12, V15, B000, B04, G12, R02, R11, R20, W1, W3, W5
Papers: Neenah Classic Crest, SU Chocolate Chip cardstock
Tools: Spellbinders Labels Eight, Ovals,
Embellishments: Diamond Glaze,

♥ Thanks for stopping by! ♥ 
Photobucket

Monday, June 7, 2010

Pretty Pink Tote!

Ok, I'm back...water aerobics was so much fun, being away from it for 3 weeks was hard so I was very happy to be back tonight!  I think I will sleep very good tonight now!  Now that I have kept you in suspense I won't keep you any longer, now onto the fun project that I promised you:
 This is a fun tote bag that I have made with one of the Elisabeth Bell for Susana's Custom Art & Card Design from Sampler Edition #4 called "Little Suzanne."  This cutie pie is named after our very own Suzanne Dean...so appropriate with the "Copics" in hand!  :)  
The tote has been decked out with some brown and pink fabric on the bottom half of the bag.  Then I used my scalloped circle nestie and cut a piece of brown felt, and used my circle nestie to cut a piece of BG Bittersweet paper for the layer behind the cute image.

Little Suzanne has been cut out with my blossom nestie.  She was colored with copics and accented with a white gel pen.  Viva Decor Glitter Liner (Holo) was added to her belt and hairband for some extra glitz.  I used chocolate Spica to get some more texture for her hair and add a soft sparkle.
Flowers are from Wild Orchid and decked out with my Viva Decor Glitter Liner (Holo) for lots of sparkle!  The gemstone sprays were from Susana, thanks so much hun they are perfect!
The tag was made with my EK Succss punch and SU Tiny Tags and Teeny Tiny Wishes sets.  Sentiment and small heart were stamped in Memento Rich Cocoa.
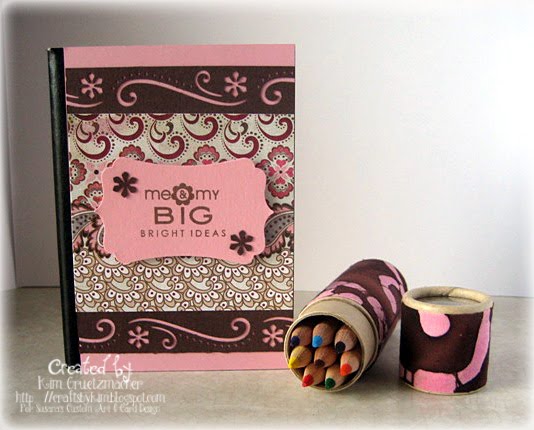
Here you can see the little notebook that has been altered with BG Bittersweet papers.  Sentiment is from PTI Take Note stamp set.  The cute colored pencils came in this cute cardboard tube and then I added fabric around the tube to match the tote. 

I hope you have enjoyed this fun gift set!  It will be added shortly to my Handmade Shop.  Click -->here<-- to go to my Store!  Happy Shopping!

Recipe:
Stamps:  Little Suzanne by Elisabeth Bell for SCACD; Take Note (PTI); Teeny Tiny Wishes and Tiny Tags (SU)
Inks: Memento Tuxedo Black, Copics, White Gel Pen, Chocolate Spica, Memento Rich Cocoa, SU Markers,
Copic Colors Used: RV02, RV13, RV23, E25, E42, E44, E47, E49, E53, E59, R29, G09, Y04, Y26, B18
Papers: Basic Grey Bittersweet Collection,
Tools: Spellbinders - Scallop Circle, Circle, Blossom Nesties, EK Success Tag Punch and boarder punch, 
Embellishments: Viva Decor Glitter Liner (Holo), Flowers (Wild Orchid), Prima Gemstone Spray, Fabric and ribbon from my stash.

♥ Thanks for stopping by! ♥

Photobucket

LinkWithin

Related Posts Plugin for WordPress, Blogger...